The following are the advantages of using Samba:
- It enables Linux/Unix servers and Windows-based clients to communicate with one another.
- File systems are shared.
- Printers installed on both the server and the clients can be shared.
- Clients logging into a Windows domain must be authenticated.
- Samba is a free and open source application.
Configure Samba File Share on AlmaLinux 8
The steps below will guide you on how to Configure Samba File Share on AlmaLinux 8 | Oracle Linux 8.
Step 1: Install Samba Packages on AlmaLinux 8|Oracle Linux 8
Update your AlmaLinux 8 | Oracle Linux 8 System as follows:
#sudo dnf update
Run the following command to install Samba:
$ sudo dnf install samba samba-client
Last metadata expiration check: 0:05:41 ago on Mon 10 Jan 2022 02:44:44 PM EAT.
Dependencies resolved.
===============================================================================================================================================================================================
 Package                                              Architecture                             Version                                          Repository                                Size
===============================================================================================================================================================================================
Installing:
 samba                                                x86_64                                   4.14.5-7.el8_5                                   baseos                                   846 k
 samba-client                                         x86_64                                   4.14.5-7.el8_5                                   baseos                                   700 k
Installing dependencies:
 samba-common-tools                                   x86_64                                   4.14.5-7.el8_5                                   baseos                                   499 k
 samba-libs                                           x86_64                                   4.14.5-7.el8_5                                   baseos                                   168 k

Transaction Summary
===============================================================================================================================================================================================
Install  4 Packages

Total download size: 2.2 M
Installed size: 6.3 M
Is this ok [y/N]: y
Step 2: Configure Samba Share on AlmaLinux 8 | Oracle Linux 8
We’ll do some adjustments now that Samba is installed to improve the application’s performance.
Before altering the configuration file, make a backup to allow for a rollback if the file becomes corrupted:
sudo cp /etc/samba/smb.conf /etc/samba/smb.conf.bkCreate samba user as follows:
sudo adduser -M sambauserWith the following command, create a Samba password for the newly created user:
$ sudo smbpasswd -a sambauser
New SMB password:<ENTER PASSWORD>
Retype new SMB password:<RE-ENTER PASSWORD>
Added user sambauser.
Now, in the /srv directory path, create a samba share called myfiles.
sudo mkdir -p /srv/myfilesFollowing that, we’ll assign permissions and ownerships as seen below:
sudo chmod -R 755 /srv/myfiles
sudo chown -R nobody:nobody /srv/myfiles
sudo chcon -t samba_share_t /srv/myfiles
Using the command below, create a new Samba configuration file.
sudo vim /etc/samba/smb.confAdd the following to the file created above:
[global]
workgroup = WORKGROUP
server string = Samba Server %v
netbios name = SambaServer
security = user
map to guest = bad user
dns proxy = no

[Public]
path = /srv/myfiles
browsable =yes
writable = yes
guest ok = yes
read only = no
Save and exit the file.
Run the following command to check the configuration:
$ sudo testparm
Load smb config files from /etc/samba/smb.conf
Loaded services file OK.
Weak crypto is allowed

Server role: ROLE_STANDALONE

Press enter to see a dump of your service definitions

# Global parameters
dns proxy = No map to guest = Bad User netbios name = ALMALINUX 8 security = USER server string = Samba Server %v idmap config * : backend = tdb [Public] guest ok = Yes path = /srv/myfiles read only = No
Step 3: Samba Share Service Management on AlmaLinux 8 | Oracle Linux 8
Run the following commands to Start and and enable samba and nmb services.
sudo systemctl start smb
sudo systemctl enable smb
sudo systemctl start nmb
sudo systemctl enable nmb
Verify status of both smb service if it’s active and running:
$ sudo systemctl status smb
● smb.service - Samba SMB Daemon
   Loaded: loaded (/usr/lib/systemd/system/smb.service; enabled; vendor preset: disabled)
   Active: active (running) since Mon 2022-01-10 15:33:01 EAT; 2min 7s ago
     Docs: man:smbd(8)
           man:samba(7)
           man:smb.conf(5)
 Main PID: 12163 (smbd)
   Status: "smbd: ready to serve connections..."
    Tasks: 4 (limit: 20981)
   Memory: 26.5M
   CGroup: /system.slice/smb.service
           ├─12163 /usr/sbin/smbd --foreground --no-process-group
           ├─12165 /usr/sbin/smbd --foreground --no-process-group
           ├─12166 /usr/sbin/smbd --foreground --no-process-group
           └─12172 /usr/sbin/smbd --foreground --no-process-group

Jan 10 15:33:00 Rocky systemd[1]: Starting Samba SMB Daemon...
Jan 10 15:33:01 Rocky smbd[12163]: [2022/01/10 15:33:01.316838,  0] ../../lib/util/become_daemon.c:136(daemon_ready)
Jan 10 15:33:01 Rocky systemd[1]: Started Samba SMB Daemon.
Jan 10 15:33:01 Rocky smbd[12163]:   daemon_ready: daemon 'smbd' finished starting up and ready to serve connections
Verify status of both nmb service if it’s active and running:
$ sudo systemctl status nmb
● nmb.service - Samba NMB Daemon
   Loaded: loaded (/usr/lib/systemd/system/nmb.service; enabled; vendor preset: disabled)
   Active: active (running) since Mon 2022-01-10 15:33:14 EAT; 2min 59s ago
     Docs: man:nmbd(8)
           man:samba(7)
           man:smb.conf(5)
 Main PID: 12216 (nmbd)
   Status: "nmbd: ready to serve connections..."
    Tasks: 1 (limit: 20981)
   Memory: 2.8M
   CGroup: /system.slice/nmb.service
           └─12216 /usr/sbin/nmbd --foreground --no-process-group

Jan 10 15:33:47 Rocky nmbd[12216]:
Jan 10 15:33:47 Rocky nmbd[12216]:   Samba name server ALMALINUX 8 is now a local master browser for workgroup WORKGROUP on subnet 192.168.122.1
Jan 10 15:33:47 Rocky nmbd[12216]:
Jan 10 15:33:47 Rocky nmbd[12216]:   *****
Jan 10 15:33:47 Rocky nmbd[12216]: [2022/01/10 15:33:47.669118,  0] ../../source3/nmbd/nmbd_become_lmb.c:398(become_local_master_stage2)
Jan 10 15:33:47 Rocky nmbd[12216]:   *****
Jan 10 15:33:47 Rocky nmbd[12216]:
Jan 10 15:33:47 Rocky nmbd[12216]:   Samba name server ALMALINUX 8 is now a local master browser for workgroup WORKGROUP on subnet 10.0.2.15
Jan 10 15:33:47 Rocky nmbd[12216]:
Jan 10 15:33:47 Rocky nmbd[12216]:   *****
Step 4: Configure Firewall for Samba Share
Now we’ll allow samba services to pass over the firewall, allowing access from the outside.
sudo firewall-cmd --add-service=samba --zone=public --permanent
sudo firewall-cmd --reload
Step 5: Accessing Samba share from Windows Client
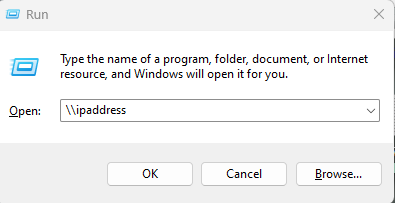
Press Windows Key + R and type the server hostname or IP address to access shared folders on Windows Client.

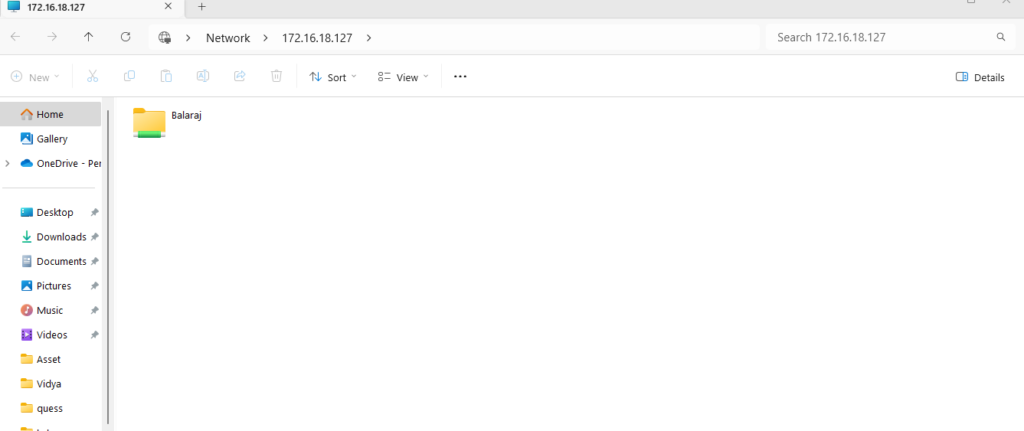
When you press enter, a shared folder named myfiles will appear, as illustrated below:

The following are the files generated in a Samba sharing server’s myfiles directory:
Step 6: Configure Samba client on Linux
To access the Samba share directory from another system, we’ll need to install the Samba client. On Debian Linux, I’m going to install the Samba client.
sudo apt install samba-client cifs-utilsTo acquire temporary access to a Samba share, run the command with the syntax listed below:
$ smbclient //sambaserver-ip/share-dir -U sambauserHere is the output:
$ smbclient //192.168.33.10/myfiles -U sambauser
Enter WORKGROUP\user1's password:
Try "help" to get a list of possible commands.
smb: \> ls
  .                                   D        0  Mon Jan 10 15:00:21 2022
  ..                                  D        0  Mon Jan 10 14:36:25 2021
  index.php                           N        0  Mon Jan 10 14:39:49 2021
  test.conf                           N        0  Mon Jan 10 15:30:10 2021
  file1.txt                           N        0  Mon Jan 10 15:20:21 2021

		44326000 blocks of size 1024. 33790808 blocks available
smb: \>
For persistent access, mount the Samba share to a directory:
sudo mkdir -p /mounts/shares
sudo mount -t cifs -o username=sambauser //192.168.33.10/myfiles /mounts/share